GNXCapture New Story command

Contents
The New Story button is used to create a new GN4 story. It opens the Create Story screen allowing you to enter the story details as well as the story text. A story Title is mandatory; all other details are optional. Some fields have default values as can be seen in the example below.
The metadata available for creation will depend on your system configuration. An example Create Story screen is shown:

Title – the name of the new story. The story name does not need to be unique as a unique identifier is given to the story
automatically.
Authors – automatically defaults to the current user but can be changed if required and more authors added.
Text – key in the body text of your new story.
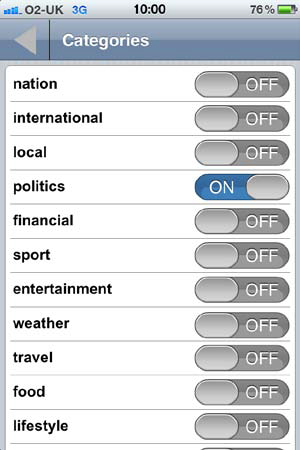
Categories – when tapped this field will open the Categories screen displaying the categories derived from your underlying GN4 configuration. Your new story can be assigned to one or more categories using the On/Off toggle buttons (example shown) or via a scroll wheel, similar to that shown in the Event date or Folder examples. Your system configuration will determine which option is available for the selection process.
Position – this field can be used to associate geo-location information with the story based on your current location. Tap the target image to determine your current location via GPS. Once located, the field will be populated with your current latitude and longitude.
Note: GNXcapture determines the current location using "Location Services". This feature is disabled by default and you will be prompted to enable it when you first use it. If you decide not to enable this feature it will remain disabled and no further prompts will be given within GNXcapture. In order to turn this feature back on (or off) you must enable (or disable) "Location Services" accessed from your own device’s Settings menu.
Event date – the date and time that the event, relating to the story, will take place.
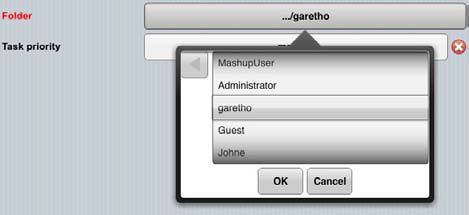
Folder – the default folder configured for the logged on user. Can be changed (via a scroll wheel) to another valid folder for the user if the system configuration allows it.
Notes – Freeform text field for entering of metadata notes. The Notes field in not shown in the example screenshots.
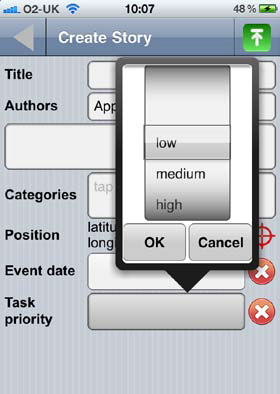
Task priority – select the priority to be given to the story.
The categories and story details used to create a story in the examples given are customisable and may differ from those you are presented with. This captured information will have been configured by your GN4 System Manager.
Once you have entered your story details and all or some of the story text, it can be uploaded to GN4 via the green upload button at the top of the screen.

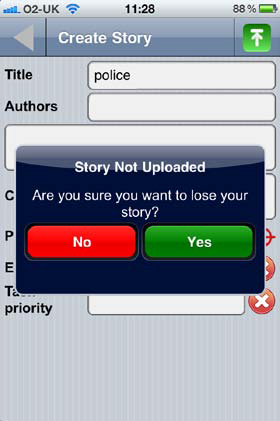
If you tap the grey arrow at the top of the Create Story screen without first uploading (saving) the story a Story Not Uploaded dialog box is presented for the user to confirm or not that the intention is to move off the Create Story screen and that the story will be lost. Selecting Yes will dismiss the Create Story screen without uploading the story, if No is selected the user will remain on the Create Story screen.
Once uploaded the Story Details are returned. Each system will return differing details depending on its configuration but an example is shown:
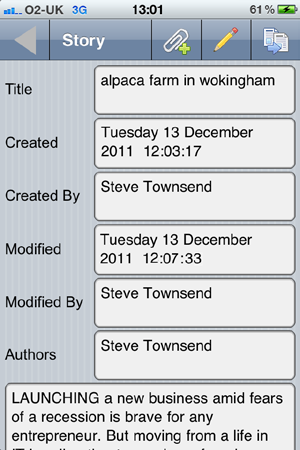
You use this Details screen to edit and update your story. At the top are three buttons:
Add Content |
Edit Story |
Send to Newsroom |


Add Content – use this button to attach multimedia files such as pictures, videos or audio clips to the story.
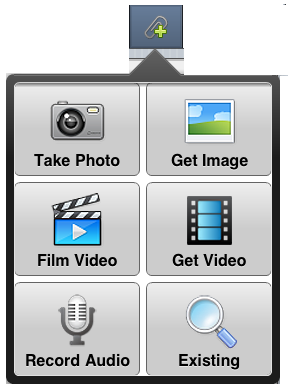
Take Photo: Use this button to take a photo and upload it to GN4.
Get Image: Use this button to retrieve an image from the device’s camera reel and upload it to GN4.
Film Video: Use this button to record a video and upload it to GN4.
Get Video: Use this button to retrieve a video from the device’s camera reel and upload it to GN4.
Record Audio: Use this button to record an audio clip and upload it to GN4.
Existing: Use this button to activate a search within the GN4 system for existing content.
It is advisable to upload (save) your story regularly in case your connection is lost. Once a story is uploaded it can be revisited and edited. If you attempt to leave your story without uploading it you will be asked to confirm that you want to lose the story.
|
Edit Story – use the Edit Story button to modify your story. The story is opened in the original editing screen allowing you to make changes to both the story details and the story text. When you make any changes they are not saved until you upload your story. You will be warned if you attempt to leave the story without uploading your changes. |
|
Upload – use the Upload button to save the current story to your default basket. A prompt is given for you to confirm this action. |
|
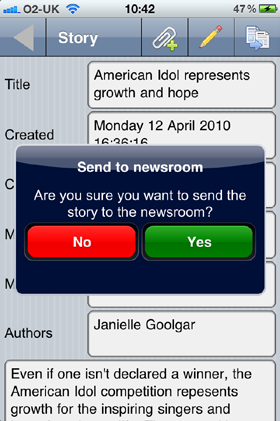
Once the content has been Uploaded to your default basket its story details are displayed and it can be sent to the Newsroom using the Send to Newsroom icon (top right). |


Note
When you send a story to the Newsroom, it follows the workflow configured for your GN4 system.
Once you have sent a story to the Newsroom you cannot delete the story. Stories can only be deleted prior to being sent to the Newsroom.
Similarly, other content items attached to a story that have been sent to the Newsroom cannot be deleted.
In both cases above, attempting to delete content already sent to Newsroom will produce a GN4 error message.
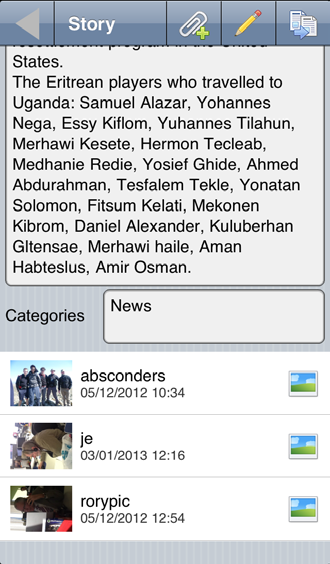
Content items that have been added to a story are visible at the bottom of the screen, with each row displaying the items name, creation date and an icon representing its content type. A thumbnail preview will also be displayed for images.
To remove an item from the story simply press and hold that items row until the “Detach Item from Story” dialog is displayed.
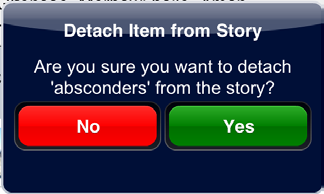
Once detached the item will still exist within the GN4 database and can still be added to other stories but will be disassociated from the current story.