APM preferences

Contents
Use the APM Preferences dialog box to review and set the automated page make-up preferences before starting the automated page make-up. Most of the preferences finely tune the APM process.
To display the APM Preferences dialog box
To display the APM Preferences dialog box, while at least one page is open, right-click the APM icon in the main toolbar, and then click Preferences. Alternatively, hold the ALT key pressed while clicking the APM icon in the main toolbar.
All the settings are permanently stored as your personal preferences, and automatically applied when you run the Automated Page Make-up with the left click on the APM icon in the main toolbar. Some of preferences appear in other dialog boxes too.
APM Preferences dialog box in version 2.6
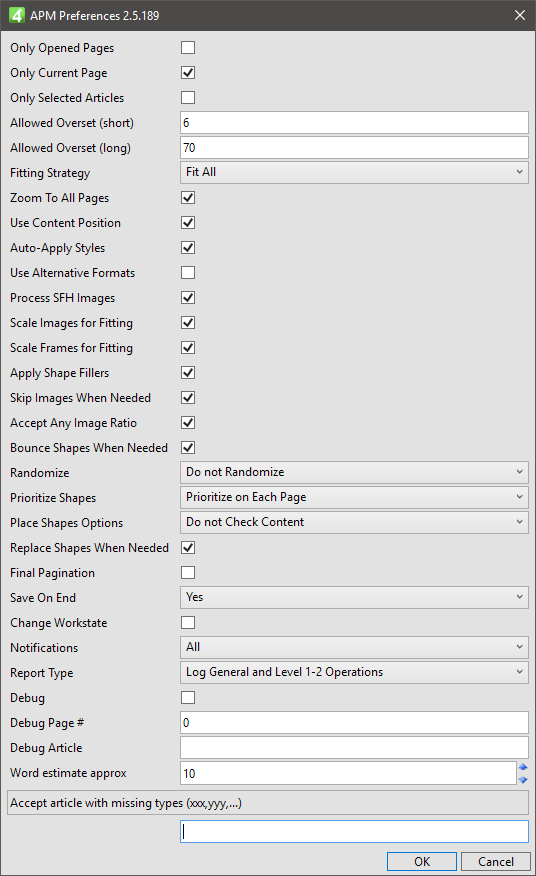
APM Preferences dialog box in version 2.5

About the preferences
The three following settings allow you to select the APM scope. Only Opened Pages Untick this setting to automatically open, as the automated page make-up proceeds, other pages belonging to the category, specified in the Categories tree. Tick the setting to perform the automated page make-up only on the currently opened pages. Important: if you tick the setting, it is recommended to double-check that all the opened pages belong to the category, selected in Categories. Even if it is not so, the software will process those pages as they would have the same category assigned, but this may lead to the later confusion, so do not do it. Only Current Page Tick the setting to ignore other opened pages, if any, and to process only the current page. Only Selected Articles Tick the setting to process only the selected articles in the Editorial navigator listing. Important: this requires that you selected the articles in the Editorial navigator BEFORE you displayed this dialog box. |
Use Content Position Tick this setting to attract to the shapes only the articles that have the same content position, e.g. to attract to the shapes marked as "leading story" only the articles whose content position is "leading story", excluding articles marked with other content position, and articles not marked at all with any content position. This makes sense if all or the most of your shapes are marked with the content position. Still, the shapes not marked with the content position will attract the articles not marked with the content position. Untick this to ignore the content positions of all shapes and all articles. Skip Images When Needed Tick this setting to allow that articles with more images get linked to the shapes with less images. Accept Any Image Ratio Reserved for the future use. Auto-Apply Styles Tick this setting to apply the styles on the frames that have the extra parameters set in the Use Styles field. See Use Styles setting for further information. |
Allowed Overset (short) Recommended value: 1. This allows to control which articles will be taken into the consideration, related to the overset/underset of the headlines, subheads, intros, kickers, pullquotes, sidebar heads and captions. The value 1 accepts all the articles whose listed elements are shorter or longer for 1 line of the available space. If you put the value to 0, only perfectly fitting articles will be taken into consideration. Allowed Overset (long) Recommended value: 5. This allows to control which articles will be taken into the consideration, related to the overset/underset of the body and sidebar text elements. The value 5 accepts all the article whose listed elements are shorter or longer for 5 lines of the available space. If you put the value to 0, only perfectly fitting articles will be taken into consideration. |
Fitting Strategy Available values: •Fit content: Fred will attempt to fit all the content using all available methods. •Fit all but head: Fred will attempt to fit all the content but the headlines using all available methods. •Do not fit: Fred will not attempt to fit the content. Use Alternative Formats Reserved for the future use. Replace Shapes When Needed Tick, to enable the shapes replacement, if no article gets found for a given shape. Scale Images for Fitting Tick, to enable scaling of images that are set to be scaled for text fitting. Note: if you untick this option, no photo will be scaled. If you tick it, only the photos that are enabled to be scaled, will be scaled. See Define the images resizing for the text fitting purpose to learn how to enable and tune the photos scaling. Scale Frames for Fitting Tick, to enable scaling of frames that are set to be scaled for text fitting. Note: if you untick this option, no frames will be scaled. If you tick it, only the frames that are enabled to be scaled, will be scaled. See Define the frames resizing for the text fitting purpose to learn how to enable and tune the frames scaling. Apply Shape Fillers Tick this setting to apply fillers to the too short body text. See About auto-fillers for further information. |
Randomize Available options: •Do not randomize: the pages and the shapes are applied in the order they are listed. This will generate the same layout on the pages on each APM run. •Randomize pages: the pages are processed in the random order. This ensures a different layout on the pages on each APM run. •Randomize shapes: the pages are processed as listed, but the shapes are placed in the random way. This ensures a different layout on the pages on each APM run. •Randomize pages and shapes: both pages and shapes are randomized. This ensures a different layout on the pages on each APM run. •Randomize pages and articles: reserved for the future use. •Randomize shapes and articles: reserved for the future use. •Randomize all: reserved for the future use. Prioritize shapes Available options: •Do not prioritize: the shapes are applied regardless the content types percentage. •Prioritize on each page: the shapes are applied considering the available content, e.g. APM takes first the shapes that satisfy all the content positions listed in the EditorialConfig. •Prioritize on each 2nd page: reserved for future use. •Prioritize on each 3rd page: reserved for future use. Place shapes options This applies to the Place Shapes Only action. Available options: •Do not check content: the shapes are applied regardless the content. •Check content: the shapes are applied considering the remaining content. •Check content and place even when 0: the shapes are applied considering the remaining content, but even if 0 content remained, the shape still gets placed. |
Zoom To All Pages Tick this setting to make Fred zoom to all the opened pages while proceeding with automated page make-up. In such case, the pages displayed on screen will become smaller and smaller as more pages get opened, but you will always see all of them. Untick this setting to have only the page being automated made-up on screen all the times. Notifications See APM notifications. Change Workstate Tick, to change the workstate of the automatically made-up page to the specified workstate. This is performed by the SetPageWS script, that, depending of the way it is called by the APM engine, uses the workstates specified in autopagWaitingWorkstateName, autopagToApproveWorkstateName and autopagApprovedWorkstateName group/user parameters. |
Debug Turn on the debug mode. Fred stops on predefined steps and tells you what it is doing. On any step you can click Cancel and stop the pagination. It is useful to understand the APM steps and evaluations. Debug page # Enter the page number on which you want the APM engine to turn on the debug mode when processing that page. The debug mode automatically turns on and stays on while the page is processed, so you can track all the steps only for that page. On opening the next page, the debug mode turns off. The status of the Debug box is ignored. Debug article Enter the few characters with which starts an article name to let the APM engine to turn on the debug mode when processing that article. The debug mode automatically turns on and stays on while the article is processed, so you can track all the steps only for that article. On processing the next article, the debug mode turns off. The status of the Debug box is ignored. |
Word estimate approx Tolerance in percentage for the estimations that indicates how much the frame capacity can differ of the text length to qualify a text as acceptable. The default value is 10%. Example: a frame has estimated 1000 characters, a text has 930 real characters. The difference is 70 characters, and because the tolerance is 10% that corresponds to 100 characters, the text will be accepted. Should the tolerance would be 5%, it would be rejected. |
Accept articles with missing types A comma-delimited list of the names of the types that are ignored if present in the logical group but not in the article. |
Bounce Shapes When Needed Reserved for the future use Final Pagination Reserved for the future use Save On End The available options are: •Yes - will save the pages only after all of them were done. •Prompt (only for debug): will prompt you to save the pages when all of them are done. •No (only for debug): will not save the pages. This is handy if you are testing the APM. Just close the pages window without saving, and reopen pages - they will be empty. •Save Every Page: select this option to perform save after every page is done. IMPORTANT: have in mind that the articles get marked as paginated only when you save pages. Therefore, if you chose Prompt or No options, do not attempt to re-paginate articles in the same session: APM is unaware that the articles were already paginated, as the pages are not saved. Use those settings only temporarily and only for debugging. The recommended option is Yes. |