Insert spaces
Press the Spacebar key to insert a standard space in text.
About multiple consecutive spaces
GN4 ignores multiple consecutive spaces inserted by pressing the Spacebar key, and uses only the first one.
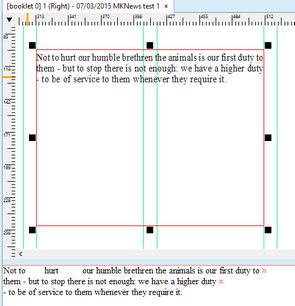
The multiple consecutive spaces are though shown in the source pane, but not on WYSIWYG or on page. On the top part of the following screenshot you see the text displayed on page, while on the bottom part you see it displayed in the source editor. Notice the multiple spaces between "to" and "hurt" and "our" that appear in the source editor, but are completely ignored on the page.
 The reason to ignore the multiple spaces is that they could break the text flow, and while they might seem useful in one situation, after you edit or change text wording, the unwanted holes might appear in the text lines when the text gets rejustified in the column.
What about indents and tabulations?
Do not use spaces to create indents: use the text indenting as explained in the Indents chapter. This applies on the first paragraph line indent too.
Do not use spaces to create tabulations: use Tables in text.
What about non-breaking space?
The non-breaking space that you can insert by holding SHIFT while pressing the Spacebar is visible on page. Have in mind, however, that the non-breaking space might disrupt the text flow and create unpleasant holes if you change the text wording and move the words containing the non-breaking spaces close to the edges of the column.
The non-breaking space purpose it to avoid that the words break - use it for that purpose and not to create extra word spacing.
To insert special spaces
On the Type menu, point to Insert White Space, and then select the option you want.
•To insert a non-breaking space, select Non-breaking space, or press SHIFT+CTRL+Spacebar.
•To insert the fixed space in the width of the M character, select EM space.
•To insert the fixed space in the width of the N character, select EN space.
•To insert the fixed space in the width of the I character, select Thin space.
•To insert the fill space, select Fill-space.
About fixed spaces
Use fixed spaces to create a fixed distance in text.
Insert fixed space with the same width of the standard space (medium space)
In versions 2.4 or newer use the script EditInsertSpaceMulti to insert a fixed space whose width is the same as the width of the standard medium space, as expressed in the Word spacing value. In previous versions, you can add it as the custom script, with this code:
<ShellCommand(CanExecute:="Ena_IsEditingText")>
Public Overridable Sub EditInsertSpaceMulti()
Text.InsTedText(">r EMW'" & CStr(Text.GetParaStatus.SpaceW) & "<")
End Sub
About deleting fixed spaces
The fixed spaces are tags, and therefore can be deleted on page by putting the I-beam exactly after the fixed space and then pressing CTRL+BACKSPACE.
About non-breaking space
Use a non-breaking space to tie words together. The non-breaking space inserts the character code 160. Please ensure that this character is enabled in all the fonts you use. Standard shortcut for the non-breaking space is SHIFT+CTRL+Spacebar.
Possible issues with non-breaking spaces
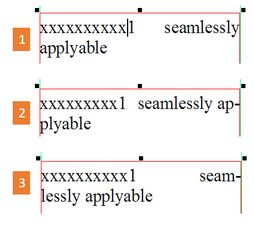
If you fill your text with many non-breaking spaces, and then you edit the content or change the column width, the text flow may appear irregular. Have in mind that the words with a non-breaking space between won't be split on the space position in a fully justified flow when they arrive at the right edge of the column. The following screenshot shows in [1] the "normal" situation: there is a standard space between two words, and they split on it when needed. The case [2] and [3] are words with the non-breaking space between - they will never break on the position of the non-breaking space. The case [3] shows a large gap created before the word seamlessly.
About fill-space
Inserting of the fill-space (space filler) is described in Use fill-space in justified text.
Notes
Although you can insert fixed spaces and the flush space in either source or WYSIWYG pane, bear in mind that their effect is not visible in the source pane, but only in the WYSIWYG pane, or on a page.

