Re-importing configuration file in the database after making changes

Contents
To re-import a modified XML configuration file in the database
•If you are using Visual Studio Express and its Tools are configured for the quick import:
On the Tools menu, select the appropriate import option (Config import, Schema import, Data import or Strings import) and wait until the import is complete.
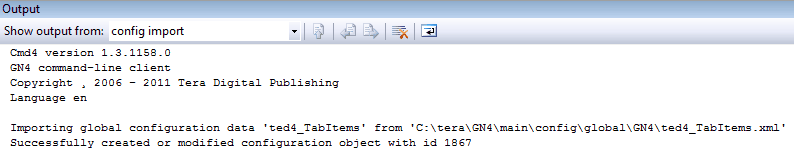
When the import is complete, the Output pane shows the results:
Important: the configuration file must be read/write and not read/only.
•If you are not using Visual Studio Express, or if you prefer the command line import:
Open the Command prompt window on the folder where the file is, and run use the following command:
c:\tera\gn4\bin\Cmd4.exe config -in xmlfilename -userName xxxx -password yyyy
where xxxx is the name of a GN4 user who can logon to system with sufficient permissions to perform this operation and yyyy is the password.
Note: the above connects to the default connection: should you want to specify the connection or server name, see cmd4 examples.
Please note that the path to CMD4.EXE can be different on your system - in that case modify the path of the above command line.
Notes
•To import data file, use c:\tera\gn4\bin\Cmd4.exe import xmlfilename -UserName username -Password password
•To import strings file, use c:\tera\gn4\bin\Cmd4.exe strings -in xmlfilename -UserName username -Password password
•To import schema file (only on server computer), use c:\tera\gn4\bin\srv4.exe dbschema -in xmlfilename
Note: import GN4.xsd even if other schemas are modified - it will load all the related schemas.
•To import configuration changes including schema changes (only on server computer), use c:\tera\gn4\bin\srv4.exe dbupdate -s xmlfilename, eg. srv4 dbupdate -config ..\config\Editorial_UpdateConfig.xml -yes
•Note: all the above examples with cmd4 connect to the default connection: should you want to specify the connection or server, see cmd4 examples.