Create objects in libraries for automated page make-up

Contents
This topic describes the appropriate procedure of creating objects in libraries for automated page make-up.
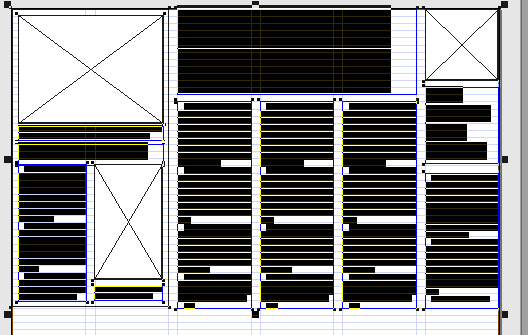
The description is based on an example for the library for horizontal halves of pages, containing 3 articles. However, the description applies on any library object for automated page make-up. The object name can be any sensible string. The object name is not coded. .
The library object in this example contains three article layouts, placed side-by-side.
Each article layout is a separate logical group, and it has an independent content position, assigned to the logical group.
Moreover, some of the objects in each article layout have the Tool actions assigned.
IMPORTANT: the total area (when you select all elements of all library layouts in a single library object) must be fixed and equal for all the library objects in the same library. These dimensions must correspond to the expected editorial hole on the page. Note: the dimensions of editorial hole comprise gutters and distance of bottom ads. The dimensions of a library object should be such to leave a necessary gutter space where needed.
Create object
Create a new empty library object as explained in Create a new empty object in a library.
Repeat the steps below for each article layout.
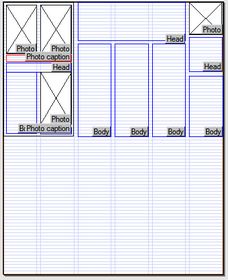
Create the article layout for the first article by means of the head and body tool (described in Text Frame Tools topic). The advantage of using head and body tool is that it automatically creates the logical grouping. |
Press F2 and then apply the formats you want to the individual frames, e.g. headline frame, all body frames, the photo caption frames and so on. Apply sensible formats: it would make no sense to apply the 60pt headline format to the headline frame 45pt high. |
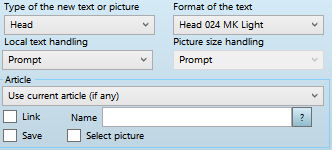
To each frame assign the appropriate values on the Tool palette. The values are:
|
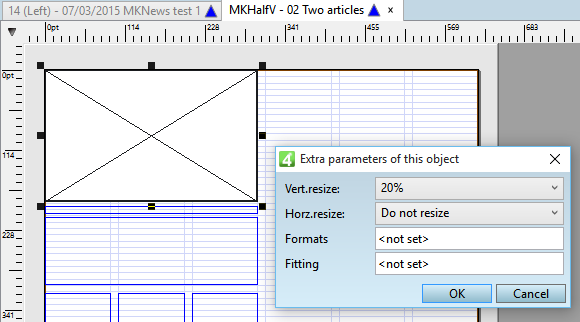
Select the image box, if any, and then in Vert. resize select the allowed percentage for the vertical resizing of the image for the body text purposes. In other words, if the body text is too long, the image can be shrunk vertically down but not more of the specified percentage, related to the original image height. If the body text is too short, the image can be stretched vertically. The shrinking and stretching will not distort the image: a combined action of resize and auto-crop will be applied on the image. The horizontal resize limit is not yet implemented.
|
Select a text box, e.g. headline, and then in Formats, enter the exact name of an alternative format to be applied on the text, if the original format causes content to get out of measure. The alternative format has to be the one that allows more text. An example: the original format applied on the headline box by F2 is MK Head 048. The alternative format, that uses the thinner typeface is MK Head 048 Light. Therefore, enter MK Head 048 Light in the Formats box. You can enter more than one format name. Separate format names by a comma. Do not insert spaces between the format name and commas. Do not insert more than one comma between two format names. As a rule of thumb, each new alternative format must allow more text in the shape. |
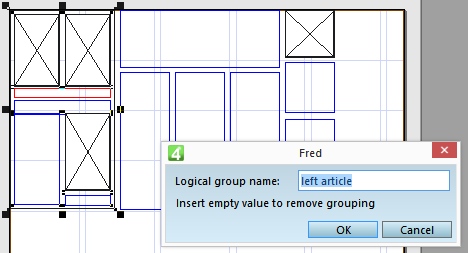
When you completed the previous step, select all the parts of that article layout, right-click, point to Logical Groups, and then click Set Name. Enter an unique name (unique for that library object), and then click OK. The name can be any appropriate string. The name is a temporary name, that gets automatically replaced by a coded name in the next steps.
|
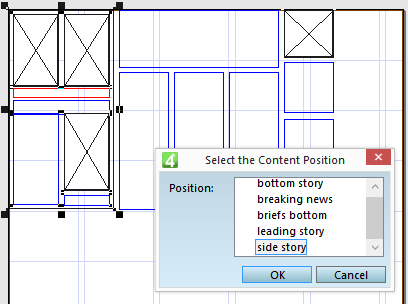
Select all the parts of that article layout, right-click, and then click Set Content Position. Select the appropriate content position, and then click OK.
Note: although you can assign the same content position to all article layouts in a library object, it is recommended to keep them different. The list of content position is indeed the list of categories in the set "content positions", so you may want to add new content positions. Beware: do not delete the existing content positions from the category set, once you assigned them to the logical groups! |
Double check that the total area (the W and H after you selected all elements of all library layouts in the library object) corresponds to the expected editorial hole on the page. Note: the dimensions of editorial hole comprise gutters and distance of bottom ads. The dimensions of a library object should be such to leave a necessary gutter space where needed. Moreover, make sure that all the objects in the same library have the same total W and H. |
Deselect all in the library window, right-click and then select Check LGS and create name. This fills the shapes with the sample temporary text (that gets automatically removed later on), creates the codified names of the logical groups and updates the description of the library shape. On the following screenshot, the measurement phase:
On the following screenshot, the names of the logical groups are automatically codified and stored in the Description field of the library shape:
|