Overview

Contents
External applications are programs that are not native part of the GN4 system – and so cannot talk directly to its server. Usually external applications are packages like PhotoShop (image editing) or Adobe Premiere (video editing), but they can be also complete third-party systems – e.g. the Dalet audio management system.
The process to edit an object in the GN4 using an external application is:
1. Copy the object data to a file on the client (local disk or a mounted network volume).
2. Mark the object as being checked-out – so that it cannot be modified by other users.
3. Modify the file with the external application and save it.
4. Submit the file to the GN4 server - updating the object.
5. Remove the checked-out mark – so that the object can again be modified by other users.
6. Set the file to read-only – so that it cannot be modified again.
When using an external third-party system instead than a standalone application the process is similar:
1. Copy the object data to the third-party system.
2. Mark the object as being checked-out – so that it cannot be modified by other users.
3. Modify the object data within the external application.
4. Fetch the object data from the third-party system, submitting it to the GN4 server - updating the object.
5. Remove the checked-out mark – so that the object can again be modified by other users.
6. Remove the object data in the third-party system or mark it read-only – so that it cannot be modified again.
GN4 supports both kind of interactions – the first one natively and the second one using plug-ins to talk with the external system. What follows applies to the native file-based operations; see File4 plug-ins for details on interacting with third-party systems.
Using the GN4 Web interface the check-out/edit/check-in process is done using the CheckOutIcon control within an object listing:
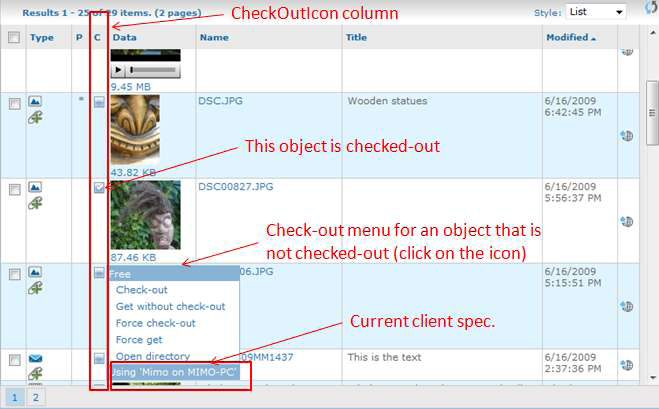
Clicking on the icon opens the pop-up menu, clicking on Check-out check-outs the object (to close the menu without selecting a command click again on the icon, or move the mouse cursor inside the menu and then outside it.).
The icon itself – and the top line in the menu – indicates the current status of the object (i.e. if it is checked-out or not). The other menu commands besides Check-out are:
•Get without check-out: copies the object data to a file without check-out. The file will be read-only – so that it can be viewed but not modified.
•Force check-out: the normal check-out command fails if the file already exists and it is not read-only – because it means that the user might have modified it, and so executing the check-out would overwrite changes. Using ‘Force check-out’ bypass this test and executes the check-out even if the file already exists and it is not read-only (note that this can be dangerous, but this function can be disabled.
•Force get: the Get without check-out command fail if the file already exists and it is not read-only.Using Force get bypasses this test and copies the data to the file even if it already exists and it is not read-only (note that this can dangerous, but this function can be disabled).
•Open directory: opens in Explorer / Finder the directory containing the object’s file (see Appendix 1: the Open directory and Open file commands for some caveats though).
The last line in the menu (that is not a clickable command – like the first line) indicates which client specification (clientSpec) is currently used. A clientSpec is a configuration object that specifies where to place (i.e. in which directory) and how to name and create the check-out files.
When an object is checked-out, the menu changes:
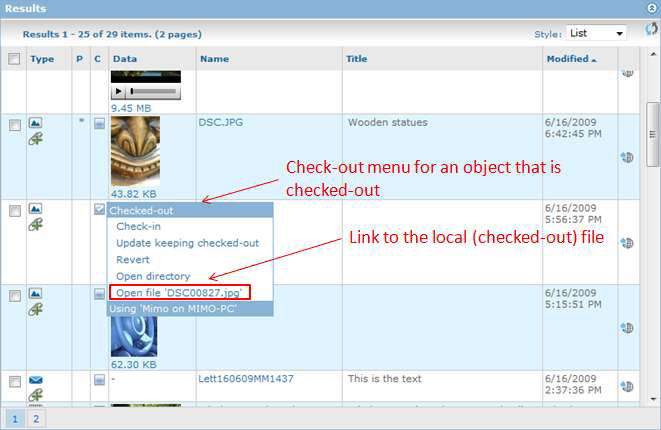
The menu commands now are:
•Check-in: updates and check-in the object and makes the file read-only
•Update keeping checked-out: updates the object without executing a check-in – i.e. save the data back in the object in the data base but continue editing the file.
•Revert: abandon the changes made to the file, copying it again from the object in the data base, clears the check-out and make the file read-only – i.e. ‘undo’ the check-out.
•Open directory: opens in Explorer the directory containing the object’s file.
•Open file xxxxxx: opens the checked-out file using its associated application (i.e. the equivalent of double-clicking on the file in Explorer or Finder).
Besides Free and Checked-out, an object can also be In use – i.e. being modified directly in the Web user interface by another user. This possibility is reflected in the check-out icon that has two additional possible values – one when the object is not checked-out but in use by another user:

and another one when the object checked-out and in use at the same time:
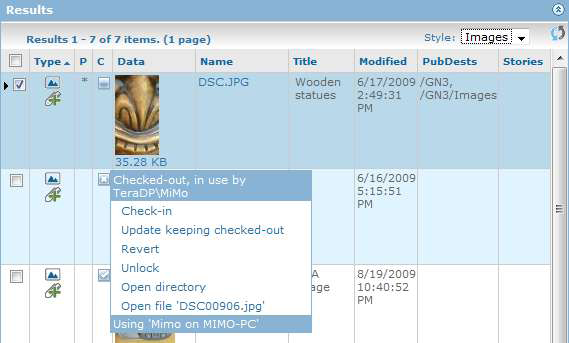
Note that in both these cases there is a new Unlock entry in the menu: it allows user with enough privileges to forcibly unlock the object – so that it is no longer in use and can be edited (this can be dangerous, and it can be disabled).
Notes
•When a modified file is submitted and the corresponding object is checked-in, the file is not removed from the client computer. It is marked as read-only – to indicate that the corresponding object is no longer checked-out – and thus the file cannot be modified.
•It is also possible to copy an object to a file on the client computer WITHOUT checking out the object by omitting the checkout option from the cmd4 clientget command. In this case, the file on the client is marked as read-only as well, because the corresponding object is not checked-out.
See also
What we need to know to edit an object?