Add a new toolbar

Contents
To add a new toolbar in system add-ins, the following steps are needed:
SHELL.VB is a add-im file you open in Visual Studio Express (as explained in Open GN4 add-ins in Visual Studio Express). The reason that toolbar of Fred4 and Ted4 are defined in SHELL.VB instead in related Ted4 and Fred4 files is that Shell files are inherited by default but Ted4 and Fred4. Locate the class: Public Class MainToolBar Add a line: Public Shared <toolbarname> = New ToolBarFactory("<toolbarname>") Define the <toolbarname> as unique at the SHELL.VB level (something like MainEdt or similar). The rest of the line is mandatory, thus an example where we created the main toolbar for Edition tab, looks like: Public Shared MainEdt = New ToolBarFactory("MainEdt") This new toolbar is known from now on as MainToolBar.MainEdt. |
A "tick sensor" function returns True if a toolbar is displayed, while it returns False if it's not displayed. This is necessary to have the option properly ticked in its drop-down menu. Each menu command has an own "tick sensor" function. Locate the region "Toolbars of Fred4, Ted4, Tracy" and create a new tick sensor function, such as example below. The function name has to be unique in its class. A best practice is to prefix the function name with Chk_. Public Function Chk_IsToggleMainToolBarEdt() As Boolean Return Main.TestToggleToolBar(MainToolBar.MainEdt) End Function Please notice that the TestToggleToolBar native command takes as parameter the toolbar name, as you specified it in the step 1, prefixed by MainToolbar, thus MainToolBar.MainEdt. |
A "toggle" toolbar function shows/hides the toolbar. Each toolbar typically has own "toggle" function. Locate the region "Toolbars of Fred4, Ted4, Tracy" and create a new toggle function, such as example below. The function name has to be unique in its class. A best practice is to prefix the function name with Chk_. <ShellCommand(IsChecked:="Chk_IsToggleMainToolBarEdt")> _ Public Sub ToggleMainToolBarEditions() Main.ToggleToolBar(MainToolBar.MainEdt, "Main", "Top", ToggleAction.Toggle) End Sub Please notice that the ToggleMainToolBar native command takes as parameter the toolbar name, as you specified it in the step 1, prefixed by MainToolbar, thus MainToolBar.MainEdt. Notice also the 3rd parameter, which is the name of the zone where toolbar should appear. The available zones are "Left", "Top", "Right" and "Bottom". Have in mind that "Right" zone is typically used by palettes, and "Left" zone by toolbox (where available), so the zones of choice as "Top", typically for the main toolbar and additional frequently used toolbars, and "Bottom" for additional, less used toolbars, or for long toolbars that do not fit in the top zone. See also Where a toolbar gets displayed? for more info. |
Here you need to select the correct file. Fred4-specific toolbars (Pages, Editions, Tracking main tabs) are defined in FRED4_TABITEMS.XML. Other toolbars (Ted4 and Fred4) are defined in TED4_TABITEMS.XML. Locate the appropriate menu set. Toolbars for the Pages main tab are defined in Fred4Main menuset, for the Tracking main tab in Fred4Tracy menuset, for Editions main tab in Fred4Edition menuset. Toolbars for Articles main tab, and for text editing on the Pages main tab are defined in Ted4Main menuset. If you are adding the first toolbar in the given main or content tab, first add <ToolBarList and </ToolBarList> as shown below. This code will enclose the definitions of every toolbar for that tab.; <ToolBarList xmlns:fredWinUI="clr-namespace:TeraDP.GN4.Editorial.WinUI;assembly=FredWinUI"> </ToolBarList> If you are adding a toolbar where some toolbars already existed, the <ToolBarList...> statements will be there already. Then, add inside it the toolbar definition (blue line) as below (the example below shows the complete code of toolbarlist, and MainEdt toolbar, still with no icons): <ToolBarList xmlns:fredWinUI="clr-namespace:TeraDP.GN4.Editorial.WinUI;assembly=FredWinUI"> <l:ShellToolBar Title="Main" ShortTitle="Main" Name="MainEdt" Band="0" BandIndex ="0" HorizontalAlignment="Left" VerticalAlignment="Top"> </l:ShellToolBar> </ToolBarList> The toolbar name you've specified in the step 1 is shown in red color. See also Where a toolbar gets displayed? for more info about Band and BandIndex properties . Now, add the first icon definition (blue line): <ToolBarList xmlns:fredWinUI="clr-namespace:TeraDP.GN4.Editorial.WinUI;assembly=FredWinUI"> <l:ShellToolBar Title="Main" ShortTitle="Main" Name="MainEdt" Band="0" BandIndex ="0" HorizontalAlignment="Left" VerticalAlignment="Top"> <l:TBBtn CommandParameter="NewEdition" ToolTip="New Edition" Icon="#filenew.gif"/> </l:ShellToolBar> </ToolBarList> where: CommandParameter: the script name to be called when user clicks the icon ToolTip: the tooltip to be displayed when a mouse hovers over the icon Icon: the icon filename Complete code: <ToolBarList xmlns:fredWinUI="clr-namespace:TeraDP.GN4.Editorial.WinUI;assembly=FredWinUI"> <l:ShellToolBar Title="Main" ShortTitle="Main" Name="MainEdt" Band="0" BandIndex ="0" HorizontalAlignment="Left" VerticalAlignment="Top"> <l:TBBtn CommandParameter="OpenDesigner" ToolTip="Open" Icon="#fileopen.gif"/> <l:TBBtn CommandParameter="Save" ToolTip="Save" Icon="#save2.gif"/> <l:TBBtn CommandParameter="Edit" ToolTip="Properties" Icon="#office0221.gif"/> <l:TBBtn CommandParameter="EditionSpikeDlg" ToolTip="Spike/Unspike" Icon="%122_spike_16.png" /> <Separator/> <l:TBBtn CommandParameter="PageAdd" ToolTip="Add single page" Icon="#office1352.gif"/> <l:TBBtn CommandParameter="Delete" ToolTip="Delete" Icon="#DeletePage.gif"/> <l:TBBtn CommandParameter="Copy" ToolTip="Copy" Icon="#filecopy.gif"/> <l:TBBtn CommandParameter="Paste" ToolTip="Paste" Icon="#filepaste.gif"/> <Separator/> <l:TBBtn CommandParameter="About" ToolTip="About" Icon="#office0048.gif"/> </l:ShellToolBar> </ToolBarList> |
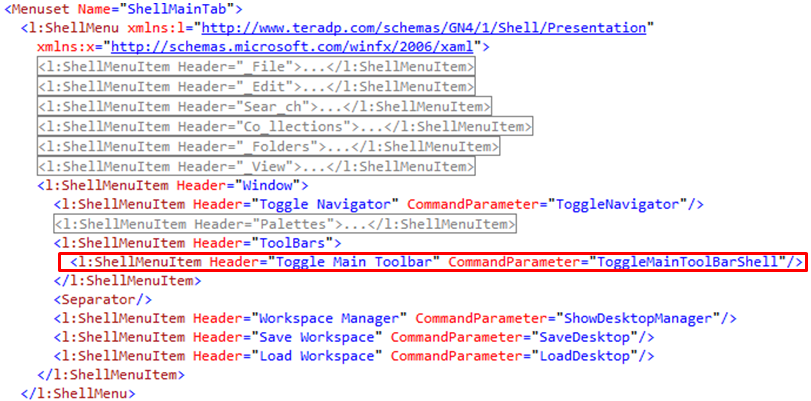
The files are the same as for the step 4. Locate the appropriate menu set, then add a line in the appropriate place.
|
--------------
To add a new toolbar in custom add-ins, the following steps are needed:
Public Class CustomShellDesignerToolBar '... End Class |
Locate the class: Public Class CustomShellDesignerToolBar Add a line: Public Shared <toolbarname> = New ToolBarFactory("<toolbarname>") Define the <toolbarname> as unique at the SHELL.VB level (something like MyToolBar01 or similar). The rest of the line is mandatory, thus an example where we created the main toolbar for Edition tab, looks like: Public Shared XXXXToolBar01 = New ToolBarFactory("MyToolBar01") This new toolbar is known from now on as CustomShellDesignerToolBar.MyToolBar01. |
A "tick sensor" function returns True if a toolbar is displayed, while it returns False if it's not displayed. This is necessary to have the option properly ticked in its drop-down menu. Each menu command has an own "tick sensor" function. create a new tick sensor function, such as example below. The function name has to be unique in its class. A best practice is to prefix the function name with Chk_. Public Function Chk_ToggleMyToolBar01() As Boolean Return Main.TestToggleToolBar(CustomShellDesignerToolBar.MyToolBar01) End Function |
A "toggle" toolbar function shows/hides the toolbar. Each toolbar typically has own "toggle" function. Locate the region "Toolbars of Fred4, Ted4, Tracy" and create a new toggle function, such as example below. The function name has to be unique in its class. A best practice is to prefix the function name with Chk_. <ShellCommand(IsChecked:="Chk_ToggleMyToolBar01")> _ Public Sub ToggleMyToolBar01() Main.ToggleToolBar(CustomShellDesignerToolBar.MyToolBar01, "Main", "Left", ToggleAction.Toggle) End Sub Please notice that the ToggleToolBar native command takes as parameter the toolbar name, as you specified it in the step 1, prefixed by CustomShellDesignerToolBar, thus CustomShellDesignerToolBar.MyToolBar01. Notice also the 3rd parameter, which is the name of the zone where toolbar should appear. The available zones are "Left", "Top", "Right" and "Bottom". Have in mind that "Right" zone is typically used by palettes, and "Left" zone by toolbox (where available), so the zones of choice as "Top", typically for the main toolbar and additional frequently used toolbars, and "Bottom" for additional, less used toolbars, or for long toolbars that do not fit in the top zone. See also Where a toolbar gets displayed? for more info. |
Here you need to select the correct file. Fred4-specific toolbars (Pages, Editions, Tracking main tabs) are defined in FRED4_TABITEMS.XML. Other toolbars (Ted4 and Fred4) are defined in TED4_TABITEMS.XML. Locate the appropriate menu set. Toolbars for the Pages main tab are defined in Fred4Main menuset, for the Tracking main tab in Fred4Tracy menuset, for Editions main tab in Fred4Edition menuset. Toolbars for Articles main tab, and for text editing on the Pages main tab are defined in Ted4Main menuset. If you are adding the first toolbar in the given main or content tab, first add <ToolBarList and </ToolBarList> as shown below. This code will enclose the definitions of every toolbar for that tab.; <ToolBarList xmlns:fredWinUI="clr-namespace:TeraDP.GN4.Editorial.WinUI;assembly=FredWinUI"> </ToolBarList> If you are adding a toolbar where some toolbars already existed, the <ToolBarList...> statements will be there already. Then, add inside it the toolbar definition (blue line) as below (the example below shows the complete code of toolbarlist, and MainEdt toolbar, still with no icons): <ToolBarList xmlns:fredWinUI="clr-namespace:TeraDP.GN4.Editorial.WinUI;assembly=FredWinUI"> <l:ShellToolBar Title="Main" ShortTitle="Main" Name="MyToolBar01" Band="0" BandIndex ="0" HorizontalAlignment="Left" VerticalAlignment="Top"> </l:ShellToolBar> </ToolBarList> The toolbar name you've specified in the step 2 is shown in red color. See also Where a toolbar gets displayed? for more info about Band and BandIndex properties . Now, add the first icon definition (blue line): <ToolBarList xmlns:fredWinUI="clr-namespace:TeraDP.GN4.Editorial.WinUI;assembly=FredWinUI"> <l:ShellToolBar Title="Main" ShortTitle="Main" Name="MyToolBar01" Band="0" BandIndex ="0" HorizontalAlignment="Left" VerticalAlignment="Top"> <l:TBBtn CommandParameter="NewEdition" ToolTip="New Edition" Icon="#filenew.gif"/> </l:ShellToolBar> </ToolBarList> where: CommandParameter: the script name to be called when user clicks the icon ToolTip: the tooltip to be displayed when a mouse hovers over the icon Icon: the icon filename |
The files are the same as for the step 4. Locate the appropriate menu set, then add a line in the appropriate place. <l:ShellMenuItem Header="Toggle My Toolbar 01" CommandParameter ="ToggleMyToolbar01"/> |