Converting and cropping graphics
Wire images, or images sent by contributors, or archived RGB images typically undergo some processing to become suitable for the print channel, e.g. conversion to CMYK, levels adjustments etc. Sometimes this happens even before images become available for editors and page designers (see Preparing graphics for publishing channels for further info).
Such processing is a four-steps operation: in the first step, a user rotates or flips, or scales, or crops the image and selects the further processing destination. In the second step, the image gets physically cropped or converted, and then copied to a folder watched by Photoshop operators or by an image enhancement software. The third step covers all image enhancements such as color levels, brightness, contrast, sharpening conversion to CMYK, etc. The fourth step comprises sending the processed image to a hot folder from where it's reloaded in the GN4 database.
Note: not all image formats are supported for cropping with the described procedure. For example, EPS and PSD formats are not supported. You can import them by skipping the crop dialog box, though.
First step: image content processing
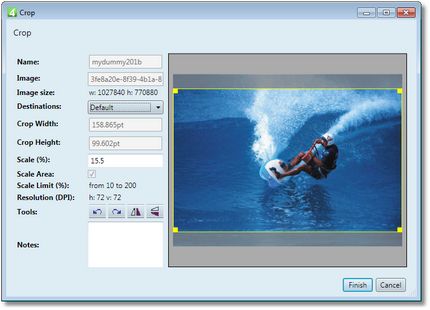
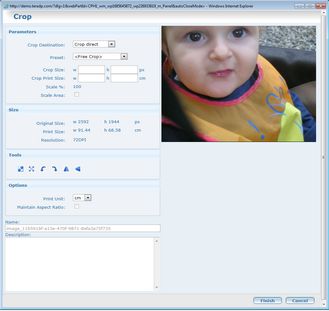
This first step requires editorial skills, not the graphical ones. Thus, it is often performed by editors, but it depends on your image workflow. In the simplest case, the user picks the entire image and just selects the further processing destination (called "extract destinations). Extract destination encloses plenty of options and automatic processing. More complex cases may include rotation and flipping of the image, scaling etc. A typical case includes also the dragging a selection rectangle over the most interesting part of the image.
Figure 1: A crop dialog in Ted4/Fred4
Figure 2: A crop dialog in browser
Second step: conversion
The second step happens under the hood, when the user clicks Finish. Thus, it's practically invisible and there is no feedback about it. The image gets converted (if needed) and or rotated/resized/flipped, and extracted to the specified URL (if any).
Third step: adjusting
The third step is also invisible to the editorial user, without any feedback. The image gets opened by a Photoshop user, or by automatic process in the image enhancement software, and it gets adjusted as needed.
Fourth step: reloading in database
The fourth step is also under the hood. The image is reimported in the database, and - if it's linked to an article or to a page, the editorial user may notice some changes. For example, if the original image was a color image, but the processing was supposed to convert it into a grayscale image, after it's reloaded in the database, it appears as grayscale in article or on page.
See also
Preparing graphics for publishing channels


