Procedure with Perforce client

Contents
This assumes you are the member of the Tera Support Team authorized to edit the standard configuration files. You're supposed to have the Perforce client installed on your workstation, and the appropriate login to access the required depots.
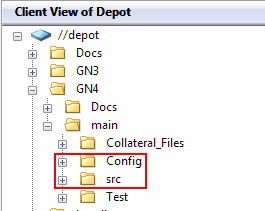
When you launch Perforce, check that you see GN4/main/config and GN4/main/src folders. If that's not the case, your login is not properly enabled, verify with Tera administrators.
The configuration files are under config, and the add-ins are under src.
More users can edit the same ASCII file (configs, add-ins) at once. Perforce provides an appropriate merging of all the changes when you submit your work.
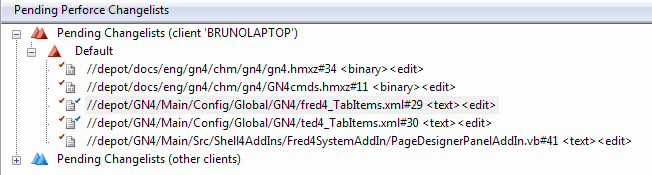
To check-out a file you want to edit, expand the folders first until you find the file. See About files in P4 depot for the structure of folders. Before checking-out a file, verify that your local copy is in sync with the depot. The files that are marked with a yellow exclamation mark Checking out a file Click to select one or more files, right-click and then select Open for Edit. The files are added to your default changelist.
The files are just checked-out by you, but not yet in editing. |
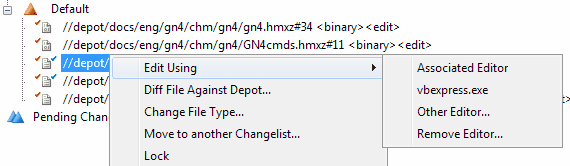
To edit a checked-out file, do following: Editing a XML checked-out file Right click the file in your changelist, and then select what you want. It is handy to edit XML files also in Visual Studio Express, but this depends on your preferences.
Editing an add-in checked-out file Do not initiate editing from Perforce, but by launching your add-in solution. In that way, Visual Studio Express loads the entire solution, and you will be able to recompile it when done. |
To check-out a file you want to edit, expand the folders first until you find the file. See About files in P4 depot for the structure of folders. Before checking-out a file, verify that your local copy is in sync with the depot. The files that are marked with a yellow exclamation mark Checking out a file Click to select one or more files, right-click and then select Open for Edit. The files are added to your default changelist.
The files are just checked-out by you, but not yet in editing. |
To test a file before submitting changes, follow the below explained procedure. XML configuration files For XML configuration files, you have to load them in the database. You can do it in many ways, a handy-one, if you are using Visual Studio Express to edit them is to load them through the Tools menu (requires that you configure your Visual Studio Express first). To load a XML configuration file, loaded in Visual Studio Express, on the Tools menu, select config import. Restart your GN4 applications and test if the change is what you expected. Add-ins For add-ins, the way to test them is to recompile them. See Compiling add-ins for the procedure. |
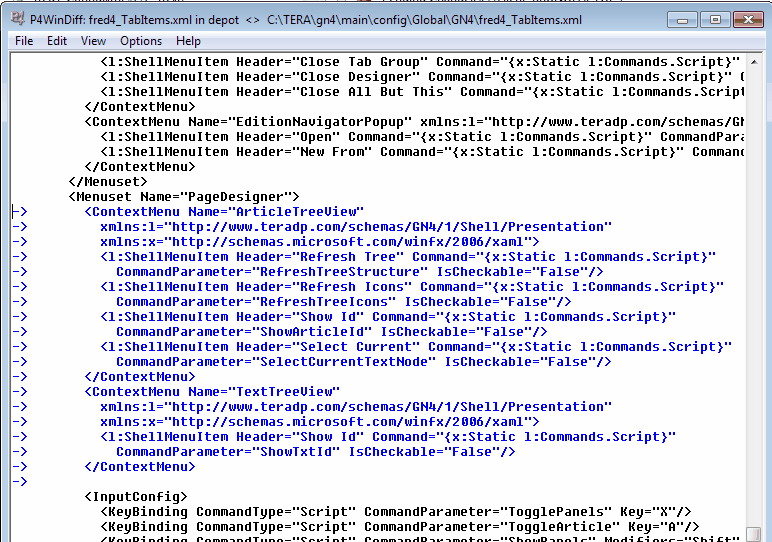
To review your changes before submitting changes, right-click the file, and then select Diff file against depot. This displays a new window, where you can press the F8 key to jump to the changes in the file. The changes are displayed in blue color.
Close the window when done. |
After testing and reviewing your changes, you have to submit them. To submit changes Select all the files that you are edited as a part of specific change, right-click and then select Move to another changelist. When prompted, select New and then click Ok. When prompted, enter a short description, and then click Submit. If the file was modified also by others In that case, the submit will fail, and you will have to Resolve the changes (merge yours and theirs). Right-click a file and then point to Resolve, and select Auto-resolve, or press SHIFT+CTRL+M. Often, auto-resolve will be fine enough. In some specific case, though, you will have to apply a merge. This is an advanced procedure - contact someone with P4 experience to guide you. |