Display options

Contents
Following graphics-related display options are available as personal preferences on the Pages and on the Articles main tab
On the Pages main tab, the preference is under Edit > Preferences > Display > Draw Images. On the Articles main tab, the preference is under Edit > Preferences > WYSIWYG > Display > Show images.
Hidden images
Draws a image as a crossed box. Use this option when you want to quickly page through spreads that have lots of images or transparency effects.
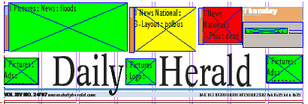
The fill color of the image box is the color of the workstate of the folder where the image resides. On the above figure, a red image is in "not ready" folder, a yellow image is in "layout" folder, while green images are in "ready" folder. The color of the cross is red for dummy images, and blue for real images.
Note: dummy images are always displayed as crossed boxes.
Displayed images
The images are displayed either as originals, or in the "preview" quality, or in the "thumbnail" quality. This depends on your personal settings. See Selecting images quality for display.
Range of sizes (WYSIWYG pane)
If your article contains images in very different sizes, it may be difficult to find the appropriate zoom to review them in the WYSIWYG pane on the Articles main tab. Therefore, you may want to activate the "normalize" feature for such images. The preference is under Edit > Preferences > WYSIWYG > Display > Image size. Enter a suitable value in the Min and Max boxes. If you enter a similar value in both boxes, all images will appear in the WYSIWYG in the similar size, independently of their real size.