Delete an article element
To delete an article element on the Articles main tab
Right click the element, and then in the pop-up menu, select Delete.
When prompted, confirm.
Note: the related script is ArticleDelCurTxt.
Change the default behavior
You can change the default behavior by editing the EditorialConfig.
By editing the EditorialConfig, you can change this behavior for all the users in the system and for all the titles, by choosing that:
•The article element is spiked after the user confirmation (default). The confirmation is asked for the spiking, and then for the element removing from the article.
•The article element is spiked silently. The confirmation is asked only for the element removing from the article.
The values are explained in Global variable for spiking removed article elements.
To enable the spiking of the article element with only confirmation of removing it from the article
1.Edit the EditorialConfig as explained in Edit EditorialConfig.
2.Make sure that there is no line containing globalspikeDelElt. If the line exist, just set the value to -1 and do not peform the step 3.
3.On the bottom, add the line <Item Name="globalspikeDelElt" Value="-1" />
4.Save the EditorialConfig and then load it in the database (the procedure is explained in Edit EditorialConfig and it depends on the editing method).
To enable the spiking of the source article with the confirmation of spiking and of removing it from the article
1.Edit the EditorialConfig as explained in Edit EditorialConfig.
2.Make sure that there is no line containing globalspikeDelElt. If the line exist, just set the value to 1 and do not peform the step 3.
3.On the bottom, add the line <Item Name="globalspikeDelElt" Value="1" />
4.Save the EditorialConfig and then load it in the database (the procedure is explained in Edit EditorialConfig and it depends on the editing method).
To delete an article element in the browser
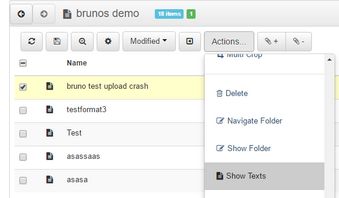
1.Select the article, and then click the Actions button.
2.Click Show Texts.
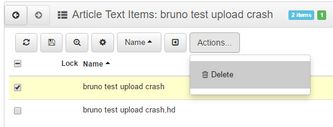
3.Select the article element to delete, and then click the Actions button.
4.Click Delete.
5.Confirm when prompted.


