Create/edit extract destination
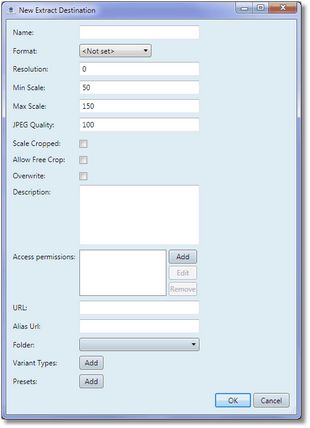
On the Object menu of EdAdmin4, click New. This displays the New extract destination dialog box. Enter required data as explained below.
Unique name of the new extract destination. |
There are three available default formats: •Cropped JPEG: only the cropped part of the image is copied in JPEG format. This means that, if the user selected crop mask smaller than entire image, only that part of image is sent to further processing. Select this option if you trust that users who perform cropping know what they're doing. •Cropped TIFF: the same as above, but only the file format is TIFF. Select this option if you prefer to deal with TIFF images instead of JPEGs. •Masked TIFF: the entire image is copied in TIFF format, and the crop mask is visible on the image. Select this option if you unsure that users who perform cropping know how to do it well. |
Enter the desired resolution for the extracted images. Note: If you specify 0, the original resolution of the image is used. This means that if you deal with many images having different resolutions, the extracted images will also have all different resolutions. Note that resolution depends also whether scaling was applied or not. The resolution of the extracted image is set to : •the resolution specified in the chosen destination, if no scaling is applied •the original resolution of the image, if the resolution specified in the chosen destination is 0, and if no scaling is applied. •If you apply scaling, the resolution is always recalculated using the expression: new_resolution = resolution * 100/resizing_percentage For example, you resized a image to 40% of the original size, the specified resolution was 120dpi, and the original resolution was 100dpi. New resolution is 120*100/40 = 300dpi. If you resized the image to 40% of the original size, and the specified resolution was 0, while the original resolution of the image was 100, the new resolution will be 100*100/40 = 250dpi. If you want to limit the range of output resolutions, you have to limit the resizing. To calculate limit, use this: min_limit = destination_resolution/desired_max_resolution*100 For example, to have a resolution between 120 and 130dpi, the min_limit is 120/130*100 which equals to 92.3. Enter 92 in the Min box. |
Enter allowed resizing percentage for this destination. For recommended values, see the discussion under Resolution. |
Enter the quality percentage. 100% is the best quality (and largest image files). |
Select it, if you want to scale images, according to the scale, set by user. |
Select, to be able to crop not using a preset (if any). See About "free crop" for more details. |
Select it, if you want to give to the users possibility to overwrite already cropped images when re-cropping them again. |
Enter an optional description of the current destination. |
Click Add, to add permissions on this destination. |
Enter destination URL or file path, e.g. c:\temp, or \\10.1.3.192\Back4\in\. If you leave it empty, the image file is not re-created, but just the img object. |
Use it to share the location of the new extracted file, without using the original destination (e.g. we extract to an ftp url, but we want to notify someone using the public http location, such as a podcast or a feed. |
Select the folder for converted images to be stored in. Note: the folder affects the workstate of the image. As the images won't move together with an article in the work flow, select the folder with the appropriate work state for the page test. |
You can set the variant type(s) that should be applied when extracting that image, in case you don't want to extract the original binary file, but a variant of it, depending on the destination). When there are no variant types, the 'data' attribute - e.g. the original image - is copied. |
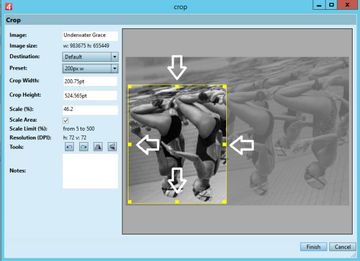
Define presets (name, width, height, type to be applied to). Since version 2.2 you can create presets with only one dimension specified (width or height), and leaving another on 0. In cropping panel of clients, added the handles in the middle of frame sides. These handles allow user to change only one side of the crop frame at time. Now, in the 'gn4:extractDestination' used for cropping, it is possible to configure a preset with only one size set (for example, only the width), and to leave the other side without any limitation. |


